Collage &Google Picasa fotoflōt | 12 Jan 2009
How to fotoflōt a Picasa collage
Are you creating a collage using Google’s Picasa 3 collage tool? Unsure how the Picasa collage sizes relate to fotoflōt sizes? That’s understandable – several of the Picasa collage Page Format options translate directly to fotoflōt sizes, but it’s not obvious how. Once you know, it’s simple.
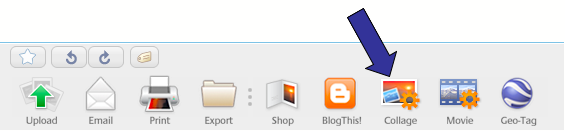
After you select the pictures you want to use in your collage, click on the Collage icon at the bottom of the screen:
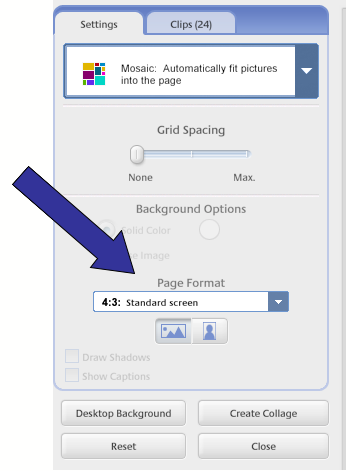
In the controls on the left side of the Collage screen, click on the Page Format pull-down menu to view the choices:
Once you’ve clicked on it you’ll see the Page Format list displayed below. The four Page Formats with arrows next to them correspond exactly to fotoflōt sizes. You aren’t limited to the sizes implied by the Page Format options; they actually describe the proportions of the collage. For example, despite its label, the 4×6 Page Format doesn’t have to produce a small print size of 4″x6″; it can be used to produce any size whose proportions are 4:6. With that in mind, the fotoflōt that can be produced with each Page Format are listed to the right of the arrow:
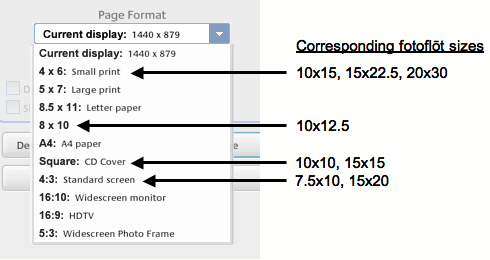
With all that in mind, choose the fotoflōt size you want for your collage, then use the corresponding Page Format. For example, if you want to make a 15″x 22.5″ fotoflōt, choose the 4×6 Page Format. The collage will fit that size perfectly.
If you use other Page Formats besides those indicated, you’ll end up having to crop off a portion of the collage when you fotoflōt it.